Configure (daddelkischde 2)
Note: The display and the sound work only after the complete configuration. Before that, the display does not show anything and should not be connected to prevent burn-in.
This tutorial will show you how to install and configure RetroPie to work with the daddelkischde 2.
You can either use the official RetroPie and customize it for daddelkischde 2, or you can use the already fully customized ZeroBOY OS 2 (based on RetroPie).
RetroPie or ZeroBOY OS 2?
RetroPie is an operating system for the Raspberry Pi that already comes with many emulators and a nice user interface. So that it works with the daddelkischde 2, a few adjustments are necessary. That's why we created ZeroBOY OS 2, which is based on RetroPie. We have already integrated all adjustments for the daddelkischde 2 to save you some work. ZeroBOY OS 2 only works with a Raspberry Pi 2/3, not with the Raspberry Pi Zero. We recommend ZeroBOY OS 2 for beginners, RetroPie for advanced users and experts.
Installation
Download the ZeroBOY OS image from the downloads or download the appropriate RetroPie image for your Raspberry Pi from the RetroPie website. Follow their installation guide on how to install the image on a micro SD card.
Note: Only from RetroPie 4.5 the Raspberry Pi 3 A+ is supported.
Note: There is no official RetroPie for the Raspberry Pi Zero 2 yet, only preliminary versions. In the downloads we have provided ZeroBOY OS 2.2 as a finished image with a preliminary version that supports the Raspberry Pi Zero 2.
To configure WiFi directly, you can copy a file named wpa_supplicant.conf to the SD card containing your WiFi credentials. You can download a sample file here (right-click on the link, "save target as ..."). Do not forget to adjust the name (ssid) and password (psk) for your WiFi in the file.
Next, you should create an empty file named ssh on the SD card. This activates the SSH service so you can log in to RetroPie via WiFi. It is not easy to create the file under Windows because files under Windows usually have a file extension. How it works: Open the Windows Explorer and navigate to the SD card. Click on "Options" in the window menu "View". The "Folder Options" window opens. On the tab "View" you remove the checkmark "Hide extensions for known file types". Close the window with "OK". Now you can create a new, empty file by right-clicking and selecting "New", "Text document". Rename the file to "ssh" (without ".txt" at the end).
Now you can insert the SD card into the Raspberry Pi and start it by connecting it to a USB power supply. If the Raspberry Pi is not yet soldered to the daddelkischde 2, and you have preconfigured WiFi and SSH as described above, you do not need to connect anything else. The configuration will be done remotely via a PC and SSH.
The first start may take a few minutes because the operating system is still configuring. Also the SSH connection, as described in the next section, will only be available after the Raspberry Pi has finished the initialization.
Configuration
Connect via SSH
You can use any SSH client (such as PuTTY for Windows) to connect to RetroPie. The host name is retropie (zeroboy for ZeroBOY OS 2), the username is pi and the default password is raspberry. You can change the password later with the passwd command.


After you have successfully logged in, you will see the colorful start banner. Below the yellow line you will see how big the file system is and how much memory is free. Size should be about the size of your SD card. If the displayed size deviates greatly, and e.g. shows only a few gigabytes, then the file system still needs to be expanded. This can be done with the command sudo raspi-config --expand-rootfs. Then you have to restart with sudo reboot.
Run setup script
Note: This step is not necessary if you are using the pre-configured ZeroBOY OS 2.
After initializing RetroPie, it's time to configure it for the daddelkischde 2. Enter the command
wget -O - "http://www.daddelkischde.de/downloads/setup_dk2.sh" | bash
and press Enter. Instead of typing the command, you can select it here, copy it and paste it into PuTTY by right-clicking. Now a script is downloaded and run, which takes over the further configuration automatically.
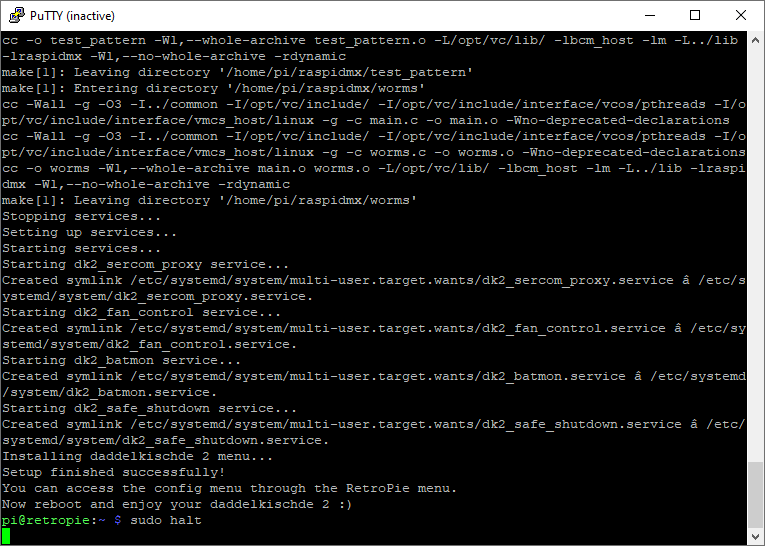
If the automatic configuration was successful, it should look something like this:

Now shut down the Raspberry Pi by typing sudo halt and then pressing Enter. You can then close PuTTY.
After about 10 seconds, you can turn off the Raspberry Pi by unplugging the AC adapter.
If you have already soldered the Raspberry Pi to the daddelkischde 2, you can now connect the display. The next time you turn it on, the display should work and you can configure the buttons.
Configuration menu

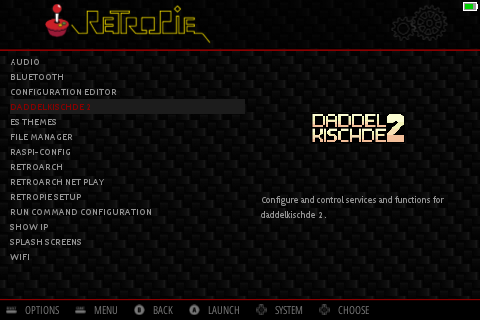
In the menu RetroPie you will find an entry for the daddelkischde 2 to start the configuration menu. Here you can configure the services and settings for the daddelkischde 2. For some menus you need a keyboard.

You can also access the menu via SSH with the command /home/pi/daddelkischde2/config.sh. This makes the operation easier with a keyboard.
Joystick
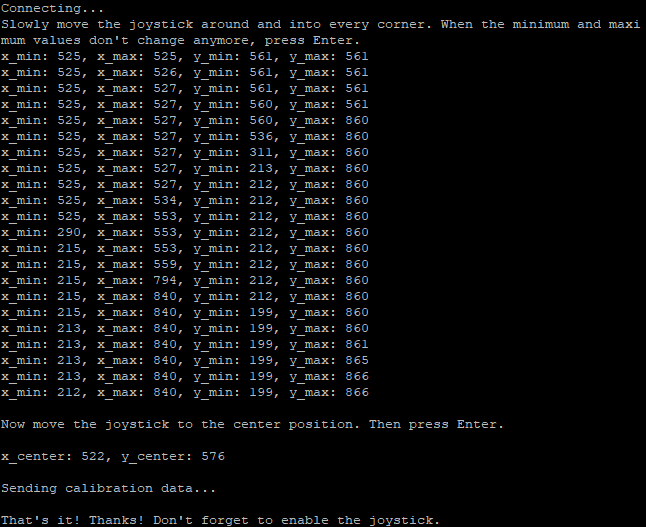
Here you can switch the joystick on and off and calibrate it. If no joystick is installed, it should be off to prevent ghost input. Follow the displayed instructions when calibrating. When calibrating, it is important to move the joystick to all four corners to determine the maximum range of motion.
Battery monitor
The battery monitor shows an icon at the top right of the display indicating the battery charge level. In this menu you can switch the battery monitor on and off. If you are well versed, you can also edit the configuration file. You should have a keyboard connected or do the whole thing via SSH. The changes will only become active after a restart.
Fan control
If a fan is installed, it can be turned on and off automatically when the temperature of the Raspberry Pi exceeds a certain limit. There is a background service controlling the fan. It can be enabled and disabled in this menu. You can also manually turn the fan on or off here. In the configuration file you can edit the limits for switching on and off. The changes will only become active after a restart.
Safe shutdown
Here you can turn the background service for the Safe Shutdown on and off. When it is turned on, and you switch off the daddelkischde 2 over the on/off switch, the Raspberry Pi shuts down cleanly and the daddelkischde 2 turns off completely afterwards. If the service is disabled, then the voltage from the Raspberry Pi is disconnected immediately and the daddelkischde 2 goes off. This is not good for the SD card, so Safe Shutdown should be enabled.
Boot logo
When the daddelkischde 2 is switched on, a logo appears on the display for a few seconds before the output of the Raspberry Pi appears. You can adjust the length of time the logo is displayed in this menu. If you set it to zero seconds, the logo will not be displayed.
Button combos
Various key combinations are configured here which switch something directly on the hardware. To avoid problems with other keyboard shortcuts, they should always consist of at least three keys.
Brightness increase: Increases the display brightness (Default: L+R+Up)
Brightness decrease: Decreases the display brightness (Default: L+R+Down)
Fan on: Turns on the fan (Default: L+R+A)
Fan off: Turns off the fan (Default: L+R+B)
Update scripts
Updates the scripts and this menu over the internet.
Update firmware
Check if there is a new firmware for the microcontroller on the daddelkischde 2 available and installs the new firmware automatically. The firmware version currently running on daddelkischde 2 is displayed at the top of the main menu.
Center games
The left side of the display is hidden by the case and the display glass. Therefore, we configure RetroPie so that 32 pixel columns are not used on the left side. Old games are usually in the format 4:3, therefore they have a black border on the left and right. Because of the left offset, the game is not centered. If this bothers you, you can configure an additional offset in RetroArch. The official guide for RetroPie can be found here.
With the setup script and in ZeroBOY OS 2, we have already set the centering for the most common emulators.
Calculate the offset x as follows: Horizontal display resolution (w_d) minus width of the game (w_g) minus 32. This sum divided by 2 and then plus 32. As a formula: x = ((w_d - w_g - 32) / 2) + 32
Example for Game Boy (356 pixels width)
((480 - 356 - 32) / 2) + 32 = 78
Add the following lines above #include to /opt/retropie/configs/gb/retroarch.cfg:
aspect_ratio_index = "23"

custom_viewport_width = "356"

custom_viewport_height = "320"

custom_viewport_x = "78"

custom_viewport_y = "0"
Example for Super Nintendo (427 pixels width)
((480 - 427 - 32) / 2) + 32 = 42
Add the following lines above #include to /opt/retropie/configs/snes/retroarch.cfg:
aspect_ratio_index = "23"

custom_viewport_width = "427"

custom_viewport_height = "320"

custom_viewport_x = "42"

custom_viewport_y = "0"
Example for Game Boy Advance (480 pixels width)
Game Boy Advance uses an internal resolution of 240×160 pixels. If you double this, you get exactly the resolution of the display: 480×320 pixels. However, this hides the left side. Therefore, if we reduce the image by 32 pixels in width and move it 32 pixels to the right, GBA games completely fill the display. To maintain the aspect ratio, the height must also be reduced in the same ratio.
Add the following lines above #include to /opt/retropie/configs/gba/retroarch.cfg:
aspect_ratio_index = "23"

custom_viewport_width = "448"

custom_viewport_height = "299"

custom_viewport_x = "32"

custom_viewport_y = "10"
Optional: calibrate joystick
If you have a joystick installed, it needs to be calibrated. Open the daddelkischde 2 setup in the RetroPie menu as described in the upper section. There you will find an entry to start the calibration. Follow the instructions on the screen. In this menu, the joystick can also be activated and deactivated.
The calibration data and activation is stored in the microcontroller on the daddelkischde 2 and therefore remains even after a reinstallation of the operating system.

During the calibration, the joystick must be moved in all directions in order to record its minimum and maximum deflection in the X and Y directions. The calibration tool shows the minimum and maximum X and Y values measured so far. The two minimum values should be around 200 (± 50) and the maximum values around 850 (± 50). If the values differ significantly, the joystick is most likely not properly soldered or defective.